Chủ Nhật, 20 tháng 6, 2010

Hello and Happy Father's Day!

Wow, it has been a long time since I last posted! Today I wanted to share with you the fun little project that I have been working on for my dear hubby.

I have gone back to basics and made a project that involves paper, photos, and lots of shabby chic techniques.

I started by creating an accordion folded album, found some fun father themed quotes and printed them onto some nice scrapbook paper.  I have tons of scrapbook paper and I really need to do more of these projects because this paper is crying out to be used.

I decided to use photos that I converted to black and white because I love the way they pop off the page against the colorful paper.  I also have to thank Becca, from Amazing Paper Grace, for inspiring me to finally use some of that ribbon that I have on a project.

I am very proud of this little project and had lots of fun making it... I also created a similar one for my Dad in shades of brown... that is the best part about using the computer :-) 


I don't have time right now, but I will convert the quotes into a PDF document if you are interested.  I will update this post when it is ready and provide a link to the full set of instructions, including the quotes should you want to use them on one of your projects.


Enjoy!
Copyright for Personal Use Antonella DeFalco

Chủ Nhật, 15 tháng 11, 2009

free quilled turkey


For those of you who have young children, you will appreciate the family turkey project we had to complete.

Each family was given a photocopied turkey to cut out and decorate. Each turkey will be given an award and posted in school on the bulletin board for the class. Every family member was asked to contribute to the project, and we were encouraged to look for things to add to our turkey.

The base of our turkey was colored with crayons. Much thought went into the color selection and what a beauty he is. We kept the "decorations" to a minimum, sticking to a collection of stickers. Daddy added some orange peel and we added some texture by cutting the webbing on our clementine crate and adding it to his belly. The final addition was Mommy's quilled turkey (I love any opportunity to share quilling with everyone).

Please find the instructions for the Turkey Pattern here:


free quilling turkey

Body:
  • 2 strips of brown
  • 1/2 strip of cream
  • I let my strips overlap so that there is very little cream showing only in the center
  • Make a teardrop shape
Head:
  • 12 in (30.5 cm) tight coil
  • Cut small triangle for beak
  • Approximately 1 in (2.5 cm) of 1/16 in ( cm) wide paper for the red wattle (this is the part that hangs down from the beak)
Tail Feathers:
  • 6 in (15.2 cm) Alternate side looping in various fall colors
  • Attach to bottom of teardrop
Wing:
  • 4 in (10.2 cm) Yellow, 6 in (15.2 cm) Red, and 12 in (30.5 cm) Brown strips - glue them end-to-end and make a shaped teardrop
  • Attach to center of body
Feet:
  • Scrap of Yellow
Looks like he is running away - do you think he's worried about Thanksgiving?

I hope you have fun with this little fellow. Here are some ideas:

  • Make a Thanksgiving card with him holding a sign that says "Eat Tofu" or "Eat Pork, the other white meat"
  • Add him to your Thanksgiving scrapbook page as an embellishment
  • Add him to a framed photograph of your thanksgiving feast
The possibilities are endless... I'd love to see what you can do...
If you use this guy, please post a comment here with a link to your post so that everyone can find your project too :-)

quilled quilling turkey thanksgiving

Enjoy!
Copyright for Personal Use Antonella DeFalco

Technorati Tags: , , , , , , , , ,

Thứ Tư, 18 tháng 3, 2009

This quilled Angel is very sweet isn't she? She is made using the Spreuer or Onion Holder technique and floats on her very "springtime" colors.
quilling quilled angel spreuer

You can follow these instructions to make her for your very own!

>quilling quilled angel spreuerHead:

2 strips of Pink paper, tight roll
Shape the tight roll by gently pushing center up

Hair (look at closeup to see how hair looks glued and curled):

1 – 6 in (7.6 cm) strip yellow
Glue yellow strip to top of head. Make 2 cuts and curl to give Angel 3 curly Q’s.

Halo:

1 – 3 in (7.6 cm) strip gold for the halo
Glue to back

For Both the Body and Wings, you will use the Spreuer Technique (click link for more information)

General instructions are to Start in the center and wrap your strip to the left then to the right. Continually going back and forth.


quilling quilled angel spreuer
Body (Make 1, look at picture):

Start at 9 – 8L – 8R – 7L – 7R – 6L – 6R – 5L – 5R

Wings (Make 2, look at picture):

Start at 7 – 6L – 5L – 4L – 3L

Embellishments:

I gave her a collar that is made from approximately 1.5 in (3.8 cm) Spiral
She also has a bouquet of flowers with some flourish of green

I placed her on a 3 in x 3 in (7.6 cm x 7.6 cm) square that I punched using a Fiskars Border punch (I loved the punch, but I was so disappointed when the punch broke)

The Quote is from Luciano de Crescenzo:

"We are each of us angels with only one wing,
and we can only fly by embracing one another"


Thứ Năm, 1 tháng 1, 2009

quilled snowman and birdhouse ornament

Happy New Year! Can you believe that 2008 has come and gone and today is the first day of 2009? Neither can I.

Have you made any New Year's resolutions? I don't typically make an official list or anything that I post and mark off what I've done. I am a list maker by nature, so this is just an addendum to the numerous lists that I have going at any given time.

A friend of mine, Bronwyn, posed a question about any quilling plans for 2009, here is my response:

... I didn't get to do as much quilling as I wanted in 2008, so one of my goals is to try to quill more in 2009. Here are some of my ideas for 2009:


  • I love birds, so I'd like to quill some birds. I can promise that this year I will have a Toucan and a Folk Art Bird pattern (these are pretty detailed), and a quick little peacock pattern that will be easy to pull together quickly.


  • If I can, maybe I can get one of my hummingbird ideas into a pattern (I have quilled a few different hummingbirds over the years, so it will be a matter of sitting down and writing down the instructions) and I would love to get around to quilling one of the bald eagle ideas I have (this is definitely more of a wish list at the moment).


  • Ballet Slippers for ballet recitals in our Spring-time. I made a pattern for ballet slippers a few years ago and have only made them and given them away as gifts so far. The term pattern is a bit loose, I have never written down the exact instructions, I more quill from memory. My niece is doing ballet now, so I want to make some for her (and maybe for some in her class too?)

  • Some ornaments - things like snowflakes and these little birdhouses that I did this year for Christmas that I really liked. The snowflake pattern will be the first pattern of the New Year!

  • I would like to do some pattern ideas to celebrate a First Holy Communion or Confirmation.

  • I think this year I will finally publish instructions for doing husking. I like to do husking and make up my own designs, but I would like to share a husked butterfly (actually, I use some husking in some of my hummingbird designs so this will be a good idea). Husking will then round out most of the different types of quilling that people do.

  • Roses - I can't believe I forgot about roses. When I first started quilling, I did a lot of these flowers that I called a wild rose. I have been using them a lot lately, so I will share those as well as instructions for the folded rose.

For those of you who will be, or plan to be in the Tampa, Florida area on May 1 - 3, 2009 perhaps you can join in the North American Quilling Guild's Quilling Conference (NAQGCON)? This is a great time if you can make it. I am planning to attend and teach a class with a friend of mine, Marion (she is going to teach Iris Folding and I am going to teach a folded rose pattern to accompany her design).

Feel free to share in the comments your resolutions or thoughts or suggestions about things you would like me to try to get to in 2009.


quilled snowflake ornament

Hugs and Happy Quilling!
Antonella :-)


Thứ Hai, 29 tháng 12, 2008


Wow! Can you believe how many patterns I have posted on this site? I know that I can't.

In an effort to make life easier for all of us, I am going to try to simplify the pattern lists for everyone. I have found many patterns along the way that I did not have a link to, so this exercise has definitely been worthwhile.

Please find a list of patterns related to Angels and Crosses. Each of these patterns would be the perfect embellishment for a card, scrapbook page, or framed art. Contact me if you have questions:


  • Christmas Angel - A different twist to the traditional Spreuer Angel. his Angel is red and green and has curly hair. She also wears her heart on her sleeve. You can use this basic pattern for so many things including a baby announcement or any religious event.
  • Angel with Quote - this beautiful pink Angel graces a frame with a quote from Luciano de Crescenzo, "We are each of us angels with only one wing, and we can only fly by embracing one another"
  • Patriarchal Cross - based on research on crosses, this is modeled after the Patriarchal cross and is made using the spreuer technique. This is a Spreuer Cross using the Patriarchal Cross design. It is augmented with delicate roses. Perfect design for Baptism, Weddings, Communions, Confirmations, Sympathy, or any religious gift or event.
  • Christmas Cross - A sweet Christmas cross with a flower in the center. A different twist on the traditional Spreuer Cross. The spreuer technique was used, but with a modified pattern to create a truly unique pattern.
Don't forget to check out the other free pattern links on the left hand side menu.

Enjoy!
Copyright for Personal Use Antonella DeFalco

Technorati Tags: , , , , , , , , ,

Wow! Can you believe how many patterns I have posted on this site? I know that I can't.

In an effort to make life easier for all of us, I am going to try to simplify the pattern lists for everyone. I have found many patterns along the way that I did not have a link to, so this exercise has definitely been worthwhile.

Please find a list of patterns related to Birds, Bugs, and other Cute Animals along the way. Each of these patterns would be the perfect embellishment for a card, scrapbook page, or framed art. Contact me if you have questions:


  • Patriotic Lady Bug - This little lady is all Red, White, and Blue. Just think out-of-the-box and she can be the colour of the flag of your country.
  • Happy Song Birds - These song birds have been added to a painted background, with quilled blossoms to make this tree come alive.
  • Pink Flamingo - You cannot think of summer without thinking of a Pink Flamingo. This is a folded rose version that has been mounted to a photograph.
  • Butterfly and Dogwoods - This is a perfect combination, a Spreuer Butterfly perched on a beautiful picture of a Pink Dogwood. This includes instructions and a link to the actual photograph so you can make the entire project on your own!
  • Teardrop Butterfly - This butterfly is made using standard marquis and teardrop shapes. You can change the color scheme to match your card or just your mood!
  • Thanksgiving Turkey - Gobble, Gobble! He is ready to join your Thanksgiving feast.


Birdhouse Theme:
Don't forget to check out the other free pattern links on the left hand side menu.

Enjoy!
Copyright for Personal Use Antonella DeFalco

Technorati Tags: , , , , , ,

Wow! Can you believe how many patterns I have posted on this site? I know that I can't.

In an effort to make life easier for all of us, I am going to try to simplify the pattern lists for everyone. I have found many patterns along the way that I did not have a link to, so this exercise has definitely been worthwhile.

Please find a list of patterns related to Love and Weddings and the such. Each of these patterns would be the perfect embellishment for a card, scrapbook page, or framed art. Contact me if you have questions:
  • Flowers of Love - Beautiful S-Scroll heart pattern just in time for Valentine's day or any love filled occasion.
  • Wedding Dress - An elegant quilled wedding dress and bouquet perfect for the bride on her wedding day. This is great to add to your bridal shower or wedding card and is the perfect embellishment for your scrapbook page.
  • Flower Girl Dress - This sweet little dress is so cute. She carries her own special little bouquet for her trip down the aisle. This link will take you to another site where my pattern is posted.
  • Wedding Cake - What wedding would be complete without the cake? Try this yummy one on for size. This is done in a style I called "Embellishment Quilling"
  • Shower or Wedding Card - Who doesn't love square cards? This one is embellished with some simple scrolls to really dress it up. This is a really easy way to dress up a card.
Don't forget to check out the other free pattern links on the left hand side menu.
Enjoy!
Copyright for Personal Use Antonella DeFalco

Technorati Tags: , , , , , , , , , ,

Chủ Nhật, 28 tháng 12, 2008

quilling scroll shapes
Scrolls, scrolls, and more scrolls... They are so much fun to make and use in your quilling.


The following are links to instructions that I have posted for making these shapes:


quilling coil shape instructions

The traditional shapes used in quilling are the coil shapes. Sometimes people will refer to them as circle shapes, but this is not a common reference. Most of the quilling that is done uses these basic shapes.

The following are links to instructions that I have posted for making these shapes:


Don't forget to check out the other free shape instructions and pattern links on the left hand side menu!


Thứ Bảy, 15 tháng 11, 2008

summer scrapbook tag

I know that I usually post about quilling projects, but I wanted to indulge in some of my other interests for a moment. This is a picture of a Summer Tag Swap that I participated in. This was for one of the groups I belong to. The only guideline is that it had to be a Summer Theme.

I hand cut the tag, I cut a rectangle and then shaped the top into a rounded triangle type shape and punched a single hole in the top. I then punched 3 additional holes along the left hand side near the top.

I picked 2 ribbons that coordinated in shades of blue and green (I thought they reminded me of a beach-y summer color). For the top hole I took a strip of both ribbons and tied them, and along the side I alternated the ribbons.

The bird was inspired by some stamps that I saw and just that 60's or 70's look in general. I sketched out a bird shape and created a template and then traced it out on patterned paper. I use the ink-to-paper method and inked the outline of the bird in this beautiful Tsukineko glimmer stamp pad. You cannot see it in the paper, but it has this glistening appearance.

Then I took my beach theme further and created a torn beach and waves look by tearing shades of green and sand. The sand also has an added glimmer with a gold and bronze mix.

The epoxy stickers are from Michael's - I thought the shells added a nice touch and the "Enjoying Life" should be everyone's mantra for the summer months - lol.

Finally, the bird was attached with a pop dot for added dimension.

The weather here is distinctly rainy and getting cold, so I thought this would warm us up and give us a bit of sunshine.


Enjoy!
Copyright for Personal Use Antonella DeFalco

Technorati Tags: , , ,

Chủ Nhật, 16 tháng 3, 2008

free quilling pattern flower girl
I want to give a special Shout Out to my friend Toni - who inspired this pattern and to my friend Marie who always makes me smile ...

This very happy Flower Power Girl is ready to brighten up anyone's day... She is perfect for a card or scrapbook page. This particular beauty was framed and given as a gift.

To Make Her Dress
Bodice - use 1/8 in (.3 cm) wide quilling paper
  • 1 - 8 in (20.32 cm) Purple Marquise
  • 2 - 4 in (10.16 cm) Purple Marquise for her sleeves

Skirt - use 1/8 in (.3 cm) wide quilling paper and 1/4 in (.6 cm) wide for fringed flower
  • 1 - 6 in (15.24 cm) Pink fringed flower
  • 2 - 8 in (20.32 cm) Red Marquise (outside)
  • 2 - 6 in (15.24 cm) Red Marquise
  • 2 - 6 in (15.24 cm) Pink Marquise
  • 1 - 4 in (10.16 cm) Red Marquise (center)
  • Arrange as shown
Tip: Place the large red Marquise on the outside and layer the remaining Marquise alternating color on top to give dimension to the skirt. You can always add more Marquise for a fuller look.

Arms, Legs and Hair
  • 2 - 3 in (7.62 cm) White strips for arms
  • 2 - 6 in (15.24 cm) White strips for legs
  • 2 - 3 in (7.62 cm) Purple Tight Coil for heel
  • 2 - 6 in (15.24 cm) Pink Tight Coil for front of shoes
  • 1 - 48 in (121.92 cm) White Tight Coil for her face
  • 5 - 4 in (10.16 cm) Pink Spiral for her hair

You can mix and match colors to match any card or layout. She was the starting point for a very happy cheerleader for my niece, I altered that design a bit and will have to share that one another day.

I hope you have as much fun as she is!

Enjoy!
Copyright for Personal Use Antonella DeFalco

Technorati Tags: , , , , , , , ,

Thứ Tư, 13 tháng 2, 2008

This is a very special heart for me. It has been published in the 2008 Accord Quilling-A-Day Calendar.

This pattern is great to use for Valentines Day, Wedding Cards, Anniversaries, any love filled moment or occasion. I have decided to use this pattern as my inspiration piece for the One World, One Heart blogging extravaganza. I say the inspiration, because I will post tomorrow the pattern for the actual giveaway.

I am including this pattern from the calendar here on my blog so that you can easily find it. The bonus is that I will also be sharing some helpful hints that were not included in the calendar.

First, I need to start by saying that there are certain shapes that I absolutely love to use, and the S-scroll shape is definitely one of those shapes. Please click here for the instructions to make the S-scroll shape.

I think you can see by the picture... I think that they make for such a light, elegant look to your quilled design. The only problem I have found with the S-scrolls is because they are so airy, there is not much glue surface area so you have to be careful with these designs. If you can attach your S-scroll to another shape that is always helpful as you now have an additional anchor point in your work.

To make the heart shape do the following (please use the picture for placement):


  • 14 - 3 in (7.62 cm) S-Scrolls – Arrange in heart shape.

  • For a perfect heart shape every time, Draw, cut, or punch out the heart shape and use this shape as your heart pattern.

  • Look closely at the top and bottom of the heart where the 2 sides meet, I found that the nicest look and shape for the heart happen when you connect/glue the S-scrolls such that they are facing eachother and you glue the bottom.

Embellishments for the Heart. I chose to use Heart Coils to add to the "LOVE" theme (the best part is that you can change the shapes and create a completely unique design):

First Heart Embellishment Arrangement:


  • 3- 3 in (7.62 cm) White Heart shaped coils

  • 2 - 1 in (2.54 cm) Green Spirals

  • Note: I have cut the 1/8 inch (.3cm) quilling strip in half, when creating the spirals for a more delicate look. You can also use 1/16 in (.15 cm) wide paper if you have some.

  • I placed the hearts at the top of the heart where it dips in the center.

  • I thought this made it look like the heart was a delicate necklace with the hearts as the pendant.

  • I have to share with you that I don't like the color green I selected. I had new paper that I wanted to use, but I would definitely go with a deeper green than this.
Second Heart Embellishment arrangement:


  • 4- 3 in (7.62 cm) White Heart shaped coils

  • 2 - 1 in (2.54 cm) Green Spirals

  • Note: I have cut the 1/8 inch (.3cm) quilling strip in half, when creating the spirals for a more delicate look. You can also use 1/16 in (.15 cm) wide paper if you have some.

  • These hearts I arranged on the top, right side of the heart for some added interest.

Here is a variation I made and framed to show you how you might modify the original design to create something similar, yet uniquely your own. :-)


Please have fun with this pattern/design. Feel free to share with me what you have created.

Enjoy!
Copyright for Personal Use Antonella DeFalco

Technorati Tags: , , , , , , , ,

Thứ Sáu, 25 tháng 1, 2008

Today's free quilling pattern is a heart filled birdhouse that I like to call the "Lovey Dovey Birdhouse." I gave this card as part of a housewarming gift.


This is done in a very perky Spring-like design and is done in a style that I like to call "adornment quilling". Adornment quilling on this project refers to the fact that I have added quilling to my paper pieced birdhouse embellishment.


If you are new to quilling, please click to learn the basics of quilling and to learn to make the basic quilled shapes that are assumed you know how to do in creating many of these designs.

I simply cut a 1.5 inch x 2 inch yellow rectangle and added a pretty pink roof. For added design, I added a strip of pink in the center to make this a 2 story birdhouse. I glued these elements in place before I added the quilling.

Starting at the roof-top and working our way down, this is what I've done.

Roof:
  • 3 - 3 inch (7.62 cm) teardrops
  • 1 - 3 inch (7.62 cm) tight coil
  • 2 - 3 inch (7.62 cm) loose coil (like a quotation mark)
Second Floor:
  • 2 - 3 inch (7.62 cm) open hearts
  • 1 - 3 inch (7.62 cm) tight coil
Middle Level:
  • 2 - 3 inch (7.62 cm) S-Scrolls
First Floor:
  • 2 - 3 inch (7.62 cm) open hearts
  • 1 - 3 inch (7.62 cm) tight coil
Add this to your Valentines Day card for a special child or loved one. If you are a scrapbooker, this is a perfect embellishment for your page. The great part about all of this is that it isn't too bulky so it won't make your page too lumpy.

Enjoy!
Copyright for Personal Use Only Antonella DeFalco


Technorati Tags: , , , , , , , , , , ,

Chủ Nhật, 13 tháng 1, 2008

Welcome to the January 2008 Accord Quilling Calendar Pattern Listing

I am providing you a list of all the patterns and the name of the artist who graciously allowed Accord to print them.

January 2008 Accord Calendar Projects

  • 1st - Party Hat (Artist: Suzzy Howard)
  • 2 - Wooly Hat with PomPom (Artist: Jane Cleveland)
  • 3 - Snowman (Artist: Cathy Schlim)
  • 4 - Snow Star (Artist: Cathy Schlim)
  • 5 & 6 - Snowflake (Artist: Donna Del Giudice, President NAQG)
  • 7 - Winter Abstract (Artist: Donna Del Giudice, President NAQG)
  • 8 - Ear Muffs and Stocking Hat (Artist: Cathy Schlim)
  • 9 - Mittens (Artist: Rita Anderson)
  • 10 - Snowflake (Artist: Rita Anderson)
  • 11 - Penguin (Artist: Deborah Hartin, www.deborahhartin.com)
  • 12/13 - Snowshoe Inspiration Piece (Artist: Deborah Hartin, www.deborahhartin.com)
  • 14 - Reindeer (Artist: Gail Freed)
  • 15 - Sleigh (Artist: Gail Freed)
  • 16 - Skis and Poles (Artist: Suzzy Howard)
  • 17 - Snowman with Hat (Artist: Pat Meetze)
  • 18 - Ice Skate (Artist: Gail Freed)
  • 19/20 - Wine Glass Charms Inspiration Piece (Artist: Susan Harl Custer)
  • 21 - Fancy Flower (Artist: Sheryl Scott, www.simplyelegantcreations.net)
  • 22 - Hat and Mittens (Artist: Nancy Klarer)
  • 23 - Art Deco Palmette (Artist: Tracy Belair Gaito, www.joiadesign.com/bean)
  • 24 - Pinwheel Flower (Artist: Sheryl Scott, www.simplyelegantcreations.net)
  • 25 - Early Art Deco Lily (Artist: Tracy Belair Gaito, www.joiadesign.com/bean)
  • 26/27 - Geometric Design Inspiration Piece (Artist: Patricia Caputo, www.whimsiquills.com)
  • 28 - Distelfink Bird (Artist: Cathy Schlim)
  • 29 - Picture Corners (Artist: Karen Frantz)
  • 30 - Pastel Border (Artist: Patricia Caputo, www.whimsiquills.com)
  • 31 - Border (Artist: Patricia Caputo, www.whimsiquills.com)
I have the pleasure of knowing many of the artists who have shared their quilling with us in January. Cathy Schlim has provided so many patterns for this calendar and she also has a book that she has published (check her out on ebay), Pat Caputo is well known in quilling circles and has an online store with great products, Donna Del Giudice is the current president of the NAQG, Jinny Alexander is known for her Jinnisans and is a published author.

I bet you can't wait to try these projects!

FYI: Most weekend days there are examples of quilling that they call "Inspiration Pieces" these items do not have instructions for creating them that are provided, but they are examples to give you ideas of ways you can use your quilling. These pieces are generally a bit more complex than the other patterns that are provided.

Enjoy!
Copyright Antonella DeFalco

Technorati Tags: , , , , , , ,

Thứ Năm, 5 tháng 4, 2007

quilled gerbera daisy

A splash of color in every Gerbera Daisy...

Do you ever like to challenge yourself? Sometimes I think it is a lot of fun, so I limited myself to the following and decided to see what I could come up with:
  • Black card blank
  • Pink and Turquoise quilling strips
  • Pink, green, and yellow squares
  • White rectangle
  • Rhinestones

For each Daisy:
  • 5 - 6 inch (15.24 cm) Teardrops
  • Place all teardrops with the points touching in the center and glue
  • 1 - rhinestone (placed in the center)

The original card that I wanted to make was this simple color blocked design. I have deliberately included 2 versions of this card to show you how a simple scrapbooking/cardmaking ink drawn stitching can make a world of difference on your finished product.

You can see that these cards are the same except for the added "stitching" on the second card. This very easy to do pattern of "dot dash dot dash dot" (. _ . _ . _ . _) really adds a finishing touch to this card. Where as the first card looks ok, you realize when you see the second card that it could be that much better.

I think my favorite thing about this card is the rhinestones. I have come to appreciate rhinestones and that special something that they add to your projects. I challenge you to take some simple products and come up with your own designs.

Stay tuned tomorrow for a whole slew of cards that I made with these same supplies. Here is my favorite card of all the ones I made.

quilled gerbera daisy


Enjoy!
Copyright Antonella DeFalco

Technorati Tags: , , , , , , , ,

Chủ Nhật, 28 tháng 1, 2007


This beautiful quilled "Flowers of Love" Valentine heart is the perfect thing to add to your Valentines Day Card to your special someone.

All paper is 1/8 inch (.3 cm) wide unless otherwise noted.

Look for this pattern in the 2008 Accord Quilling-A-Day Calendar.


To make the heart shape do the following (please use the picture for placement):
  • 14 - 3 in (7.62 cm) S-Scrolls – Arrange in heart shape.Tip: Draw, cut, or punch out heart shape and use as a pattern to get the heart shape.

Flowers:
  • 4 - 1 in (2.54 cm) Spirals – I have cut the 1/8 inch (.3cm) quilling strip in half, for a more delicate look.

Enjoy!
Copyright Antonella DeFalco

Technorati Tags: , , , , , , , , , , ,

Thứ Năm, 25 tháng 1, 2007

Are you ready for lots of free quilling patterns? I had so much fun with my December Days of Quilling that I thought we'd have some fun with Valentines Day around the corner. So let's have some fun with hearts and hugs and lots of love.

As I add patterns I will keep updating this list, so stay tuned.
  • Day One - Lovey Dovey Birdhouse. A bright pink birdhouse with hearts and more hearts, just waiting for birds to visit.


Happy Quilling!

Enjoy!
Copyright Antonella DeFalco

Technorati Tags: , , , , , , , , , ,

Thứ Tư, 24 tháng 1, 2007


Brrr.... It has gotten colder here, and I was thinking that something that reminded me of warmer days would be nice...

Here is a Palm Tree that you can add to a card or to a scrapbook page. It is very easy to make.

For the Tree Trunk:
4 -
3 in (7.62 cm) C-Scrolls
1 -
2 in (5.08 cm) C-Scroll

Leaves:
1-
12 in (30.48 cm) Alternate side looping palms (refer to photo)

Alternate Side Looping:
Start with Center loops, first loop approximately ½ inch, second loop larger, bring strip to left and loop then to right and loop. Continue left loop, then right loop, and final left loop then right loop. Place a dab of glue at the bottom each time you pass by.

Coconuts:
1
- 2 in (5.08 cm) Tight Roll
1 -
3 in (7.62 cm) Tight Roll

This is a picture of how I incorporated this design on a card. I could have added a similar embellishment to a summer scrapbooking page or if you are feeling a bit mischievous you can add this to a Christmas page with Santa hanging out at the beach for a well deserved vacation.

Happy Quilling!

Enjoy!
Copyright Antonella DeFalco

Technorati Tags: , , , , , , , , ,

Thứ Tư, 5 tháng 7, 2006

quilling announcement heart flowers How long should my quilling strip be? What size should I use?

This is an age old question that there is no easy answer. Ok, this is going to sound like such a non-committal answer, but I will explain why and then I will offer you a printable tool to help you through the process. :-)

Let us start with this thought... If you have a roomful of quillers and gave each of them a 4" strip of quilling paper, you will find that each coil, although similar, will be a little different. Ok, perhaps this is a bit of an exaggeration, but you get the point. So the question is why? The following is a list of things that you do as a quiller that have an impact on the size of your coil and helps explain why the same shapes can and are different among quillers. It also gives you permission to be yourself and just enjoy the process and learn your own quilling style :


  • If you use a slotted tool, you will have a larger hole in the center than if you use a needle tool or pin or finger roll your paper.

  • When you make your coils the amount of tension that you apply to the paper as you are turning it has an effect on how much the coil loosens, or how big it becomes, when you let go.
  • The paper that you use has an effect. I will even tell you that I have found differences in using a multi-pack of quilling paper. Yes, even though it is the same manufacturer, I find that some strips roll easier than others.

  • As obvious as this may sound, if you are tired when you are rolling your strips (come on now admit it, you were up past your bedtime because you just had to get some quilling done) your own coils and shapes will look different.

  • I have mentioned this before, but everyone develops their own style and this too will change over time. Think of how you pinch your coil to make a shape, chances are you may hold it and pinch it using a different combination of fingers than your neighbor.
So, the next time you have a pattern and you are diligent and use the exact size specified in the pattern, don't be surprised that yours looks different. This is good! Quilling is a personal experience and these differences are what allow you to make this art your own. This is what handmade means, no two items are the same! Looking for ideas? Don't forget to check out the links on the left hand for lots of free patterns and instructions to making quilling to embellish cards and scrapbook pages, frames, announcements, and invitations.

free quilling coil shapes guide
free quilling spiral shapes guide free quilling scroll shapes guide

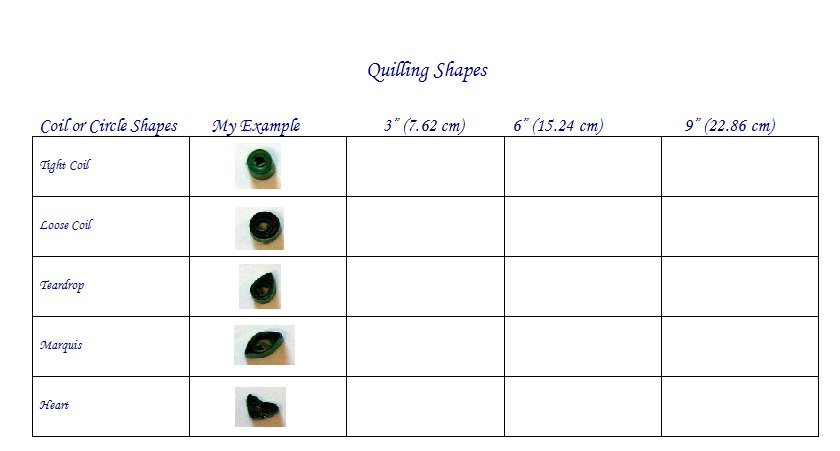
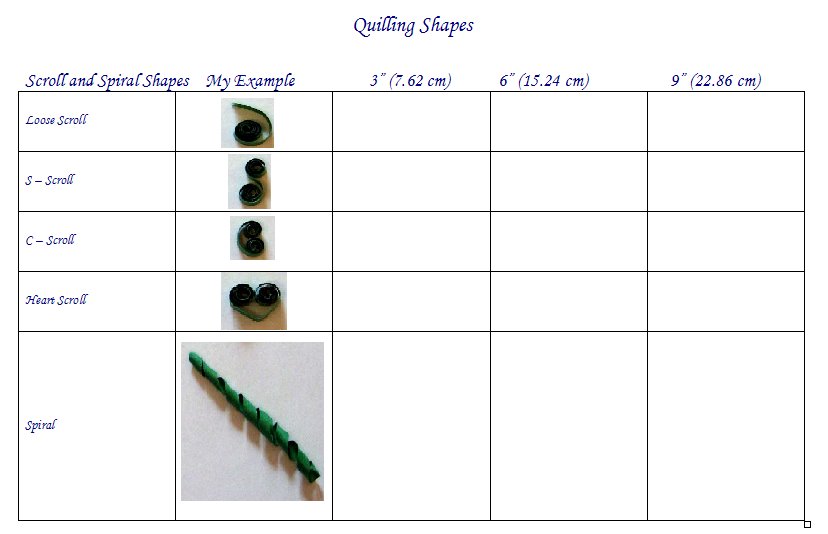
The attached photo is a quick way to practice your shapes and be able to have a visual to gauge your rolling style. This file will allow you to create your own personal "Quilling Guide" I recommend starting with the 1/8" (.3cm) wide quilling paper. Feel free to do this for the different widths of paper that you use the most. I have included an example of each shape for your reference, now do the following:

  • Print the image above, preferrably on a thicker paper or cardstock.

  • Select a specific width of quilling paper. Cut quilling paper into various lengths 3" (7.6 cm), 6" (15.2 cm), 9" (22.9 cm) as identified in the printout.

  • Roll each of the shapes. Click these links for instructions to making the Coil Shapes and Scroll Shapes if you are uncertain how to make a particular shape.

  • Glue the shape to the paper and store this with your quilling supplies. The next time you are quilling, take this out as a handy reference guide for selecting the best size strips for the project you are working on.
This is a fun exercise and is good to let you know that you can quill. Now you can use these shapes and compare them to the patterns that you see. This can be helpful to get the correct proportions when you make the pattern.

As you continue to quill, you may want to repeat this exercise and see how much you and your quilling style has changed.

Please be certain to keep a few of your early quilled pieces, you will want to remember them and treasure them in years to come. If you are like so many of us, your quilling will be shared with all your friends and family and you will find that you have none to enjoy for yourself. Everyone will be quite pleased that you did! :-)

Enjoy!

Copyright Antonella DeFalco


Technorati Tags: , , , , , , ,
nghe nhạc trực tuyếnNấu món chay | học nấu ăn DJ - Ảnh đẹp | xalotinnhanh